Fast, accurate, and up to date, RedisBank provides you with instant access to your finances with just a few swipes on your smartphone. Since mobile banking has propelled itself forward from the financial fringes and into the mainstream, we’ve all gotten used to the idea of having our entire banking information in our pockets wherever we go.
In response to this transition towards digital, Lars Rosenquist has built an application that allows you to create your very own mobile banking application. By using Redis, all of your financial information will be available in real-time, allowing you to monitor, record, and plan your finances accurately.
Let’s take a look at how Lars managed to put this application together. But before we go into the nuts and bolts of this app, we’d like to point out that we have an exciting range of applications for you to check out on the Redis Launchpad.

So make sure to have a peak after this post!
You’ll build an online banking application that will provide you with real-time updates on your bank account. With RedisBank, you’ll be able to keep a close eye on your spending and adopt a healthier relationship with money.
Below we’ll walk you through each step of the building process and highlight all of the required components to bring this application to life.
Ready to get started? Ok, let’s dive straight in.
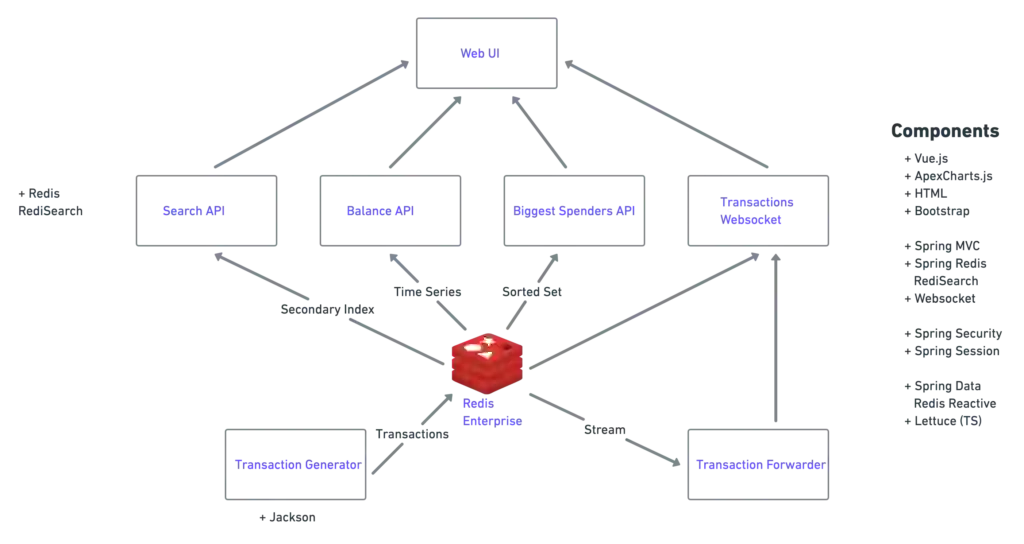
This app also uses a range of Redis core data structures and modules. These include:

This is a SpringBoot application that consists of APIs and a front end.
git clone https://github.com/redis-developer/redisbank/
docker run -d --name redis-stack -p 6379:6379 redis/redis-stack-server
./mvnw clean package spring-boot:run
Results
[INFO] --- maven-compiler-plugin:3.8.1:testCompile (default-testCompile) @ redisbank ---
[INFO] Changes detected - recompiling the module!
[INFO] Compiling 2 source files to /Users/ajeetraina/projects/redisbank/target/test-classes
[INFO]
[INFO] <<< spring-boot-maven-plugin:2.4.5:run (default-cli) < test-compile @ redisbank <<<
[INFO]
[INFO]
[INFO] --- spring-boot-maven-plugin:2.4.5:run (default-cli) @ redisbank ---
[INFO] Attaching agents: []

  .   ____          _            __ _ _
 /\\ / ___'_ __ _ _(_)_ __  __ _ \ \ \ \
( ( )\___ | '_ | '_| | '_ \/ _` | \ \ \ \
 \\/  ___)| |_)| | | | | || (_| |  ) ) ) )
  '  |____| .__|_| |_|_| |_\__, | / / / /
 =========|_|==============|___/=/_/_/_/
 :: Spring Boot ::                (v2.4.5)
Navigate to http://localhost:8080 and login using the following credentials:
Please refer to this file for the credentials as these values are hard-coded for demonstration purpose.
Below is a screenshot of what the login page should look like.
Once you log in, you’ll land on the main portal page (see below).
From here, you’ll be able to get a tighter grip on your finances through a number of different portal features. These include:
Redis Streams is an append-only log. The data generation app will put transactions on the Stream and the application will subscribe to this Stream and will consume any income transactions and send them to the frontend over a Websocket connection.
The first two interfaces allow you to implement the afterPropertiesSet()method and the destroy()method which you’ll use for the setup and cleanup of your subscription to the Redis Stream.
The third one makes you implement the nMessage(MapRecord<String,String, String> message) which is the callback that will be executed whenever a new bank transaction comes in via the Redis Stream.
At this point you’ll be subscribed to the Redis Stream. Whenever a new message arrives on the Stream, the onMessage(…) method of this class will be called. You’ll still need to carry out this method, so let’s look over how this is done.
if (subscription != null) {
    subscription.cancel();
}

if (container != null) {
    container.stop();
}
Up to now we’ve created a MessageListener and subscribed to Redis Streams of BankTransactions and, for each incoming BankTransaction, forward the BankTransaction to the Stomp/Websocket topic.
Now let’s see how this works in our application. Firstly, run the data generation app in a terminal window. After that one is running, in a separate terminal window, build and run the app:
./mvnw clean package
./mvnw spring-boot-run
Both should be running at this point, so navigate to http://localhost:8080 and log in using username/password. You should have access to an overview of transactions as well as a few non-optimized areas of the app (we’ll hop onto this shortly).
You should see new transactions appearing approximately every ten seconds. If not, check your source code and see whether you’ve missed any annotations. Now let’s go over how you can add the search feature.
RediSearchCommands<String, String> commands = srsc.sync();
    SearchOptions options = SearchOptions
            .builder().highlight(Highlight.builder().field("description").field("fromAccountName")
                    .field("transactionType").tag(Tag.builder().open("<mark>").close("</mark>").build()).build())
            .build();

    SearchResults<String, String> results = commands.search(SEARCH_INDEX, term, options);
Note: When adding imports, choose the com.redislabs imports.
The first statement creates a RediSearch connection that uses the RediSearch client library. The second one creates SearchOptions based on your preferences. The third statement executes the search and returns the results.
The data generation app also populates a TimeSeries for the bank balance of each account. This is updated every time there’s a new transaction. You can query this TimeSeries and pass the result to the user interface so it can show the balance over time in a visual diagram. Now let’s get started:
String balance_ts_key = BALANCE_TS + principal.getName();
Map<String, String> tsValues = tsc.range(balance_ts_key, System.currentTimeMillis() - (1000 * 60 * 60 * 24 * 7),
        System.currentTimeMillis());
Balance[] balanceTs = new Balance[tsValues.size()];
int i = 0;

for (Entry<String, String> entry : tsValues.entrySet()) {
    Object keyString = entry.getKey();
    Object valueString = entry.getValue();
    balanceTs[i] = new Balance(keyString, valueString);
    i++;
}
return balanceTs;
What you’re essentially doing here is asking for the time series values stored under the key of BALANCE_TS between now and (now -1 week). You’ll then need to copy the results into a Balance array and return it.
You may notice that you’ll be using the Principal name here to suffix the TimeSeries key. This means that if you log in with a different user, it will be a different key.
Note: in this example we didn’t use an additional client library for a reason. Instead, we extended the Lettuce library and provided an interface that we injected. Extending Lettuce is a fantastic way of adding Redis Module functionality into your app whilst limiting the amount of dependencies.
Adding this feature onto the app will show the biggest deductors from your bank account. Because of this the data-generation app is populating a Sorted Set. For every transaction, it will add the value of the transaction to a member of the sorted set of which the key is the counter-account’s name as well as the total amount of transactions for that account.
String biggestSpendersKey = SORTED_SET_KEY + principal.getName();
Set<TypedTuple<String>> range = redis.opsForZSet().rangeByScoreWithScores(biggestSpendersKey, 0,
        Double.MAX_VALUE);
if (range.size() > 0) {
    BiggestSpenders biggestSpenders = new BiggestSpenders(range.size());
    int i = 0;
    for (TypedTuple<String> typedTuple : range) {
        biggestSpenders.getSeries()[i] = Math.floor(typedTuple.getScore() * 100) / 100;
        biggestSpenders.getLabels()[i] = typedTuple.getValue();
        i++;
    }
    return biggestSpenders;
} else {
    return new BiggestSpenders(0);
}
This will retrieve the members of the Sorted Set by their score from 0 up to Double.MAX_VALUE. You’ll then put the result in a BiggestSpenders object.
You should now be running, so navigate to http://localhost:8080 and log in using username/password. At this point you’ll now see an overview of transactions.
Redis Streams
The data generation app generates a bank transaction every 10 seconds or so and puts it in a Stream. You can query the stream using:
xread count 10000 streams transactions_user 0-0
This will provide all of the entries on the transactions_username Stream. Remember that your app subscribed to this Stream via Spring Data, so every time a new element is added to the Stream it will be processed by the app and sent to the user interface.
Sorted Set
The data generation app also adds every transaction to a Sorted Set. This will add the transaction amount to the score, adding up the totalled transaction amount per account name and storing it in a sorted set. You’ll then be able to identify the biggest spenders by simply querying the Sorted Set like this:
zrangebyscore bigspenders_username 0 10000 withscores
TimeSeries
The data generation app also adds the bank accounts balance to a TimeSeries every time there is a new transaction being generated. This allows you to view the balance over time by using a query such as:
ts.range balance_ts_username 1623000000000 1653230682038 (use appropriate timestamps or it will return an empty array)
Hashes
Each transaction is stored as a Hash in Redis so it can be indexed by RediSearch. You’ll be able to search for each transaction just like in the example below:
ft.search transaction_description_idx Fuel
ft.search transaction_description_idx Fuel highlight
ft.search transaction_description_idx Fuel highlight tags <mytag> </mytag>
Session Data
Session data is also stored in Redis. This requires no code from your end whatsoever – adding the dependencies is enough.
spring.redis.host=your ACRE hostname
spring.redis.port=your ACRE port (default: 10000)
spring.redis.password= your ACRE access key
stomp.host=your ASC app endpoint URL (Default: <appname>-<service-name>.azuremicroservices.io)
stomp.port=443
stomp.protocol=wss
az spring-cloud app deploy -n acrebankapp -s acrebank -g rdsLroAcre --jar-path target/redisbank-0.0.1-SNAPSHOT.jar
Use the below code to get the application logins:
az spring-cloud app logs -n acrebankapp -g rdsLroAcre -s acrebank
Note: The project is compiled with JDK11 since it’s the max LTS version that’s supported by Azure Spring Cloud. The project will also be able to run locally or on other platforms up to JDK16.
Below are some known issues that you may come across:
Mobile banking is the new norm and it has to be fast, easy, and accurate for it to be effective. The digital era has made us all accustomed to seamless digital interactions that are updated in real-time, and failing to meet these expectations will create a sub-optimal application that’s destined for the rocks.
But through its advanced capabilities and low latency, Redis is able to guarantee real-time data transmission, eliminating the likelihood of any lags from occurring. From just a few taps on their mobile device, users can access their banking information and gain a holistic and accurate view of their finances.
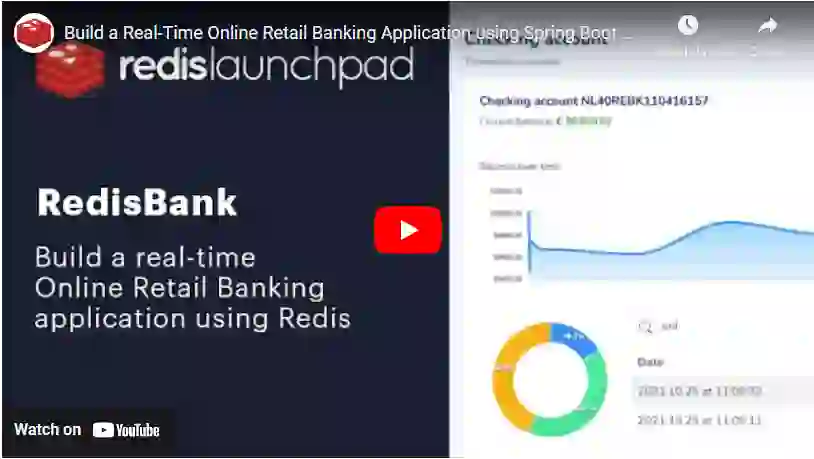
To gain a more visual insight into how this application was created, make sure you check out Lars’s YouTube video here.
And if you’ve enjoyed this post, make sure to visit the Redis Launchpad where you’ll have access to a whole variety of different applications that are making an impact on everyday lives.
Check it out. Be inspired. And join in the Redis fun!

Lars has a broad range of experience in the software industry but currently works as a solution architect manager to help others reach the best of their abilities. Make sure to follow his GitHub page to stay up to date with all of his projects.